The Science of Invisible Repair
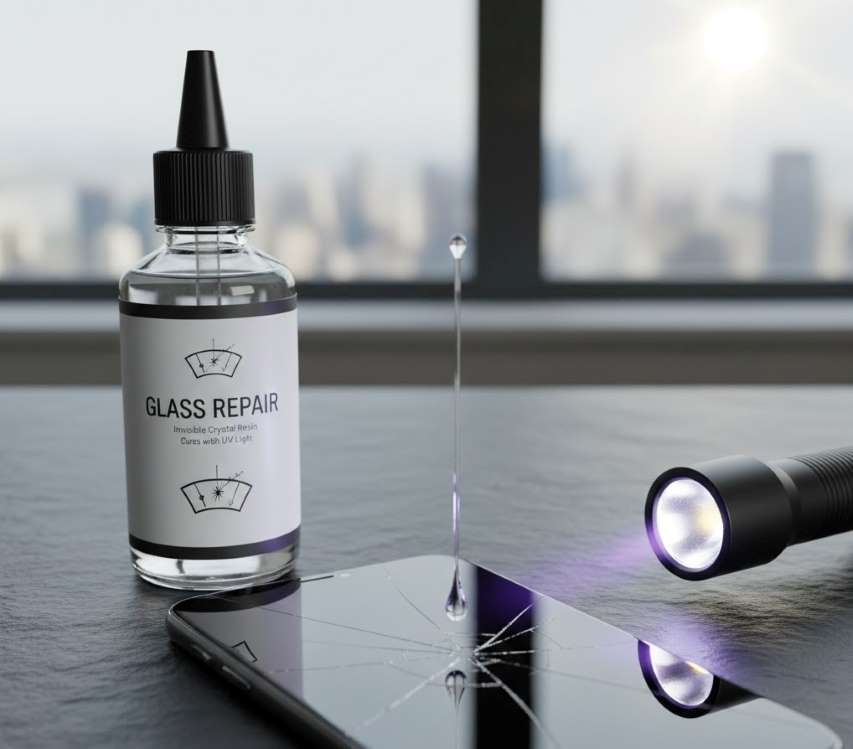
Glass repair liquid is a specialized, optically clear resin system designed to fill and structurally reinforce cracks, chips, and bullseyes in glass surfaces—most commonly automotive windshields, but also applicable to windows, glass tabletops, and screens. Unlike adhesives that bond edges, it works by capillary action and polymerization, restoring clarity and strength to damaged glass, often making repairs virtually invisible and preventing crack propagation.
Core Chemistry & How It Works
The Principle: Refractive Index Matching
The repair liquid is formulated to have a refractive index nearly identical to glass (~1.5). When cured, light passes through the resin and the glass at the same speed and angle, minimizing the visual distortion of the crack.
The Process:
Capillary Infiltration: The low-viscosity liquid is drawn by vacuum pressure or gravity into the microscopic fissures of the crack via capillary action, completely filling the void.
Polymerization (Curing): Once filled, the resin is activated—typically by Ultraviolet (UV-A) light—initiating a cross-linking reaction that transforms the liquid into a solid, durable plastic.
Structural Integration: The cured resin bonds to the glass walls, restoring up to 85-95% of the original structural strength and creating a single, continuous optical path.
Components of a Professional Repair Kit
Component | Description & Purpose |
|---|---|
| Repair Resin | The core liquid. Formulations vary: Standard resin for surface cracks, low-viscosity resin for deep, hairline cracks. |
| UV Curative / Hardener | A photo-initiator within the resin that responds to UV light. Some systems use a separate hardener droplet mixed before application. |
| Application Bridge | A device that mounts to the glass, creating a sealed chamber over the damage. Includes a vacuum pump or plunger to draw resin into the crack. |
| UV Cure Lamp | A specialized lamp emitting high-intensity UV-A light (365-395 nm wavelength) to cure the resin rapidly and thoroughly. |
| Tools | Includes razor blades, picks, curing films, and polishing pads for surface preparation and finishing. |
| Cleaning Agents | Isopropyl alcohol or specialized glass cleaners to ensure a contaminant-free surface for optimal adhesion. |
Step-by-Step Repair Process
Phase 1: Preparation & Setup
Assess Damage: Ensure the damage is clean, dry, and in the repairable zone (not in driver's critical sight line, not through both layers).
Clean Thoroughly: Use a razor blade to gently remove any loose glass particles. Clean with isopropyl alcohol. The goal is a perfectly clean, dry fissure.
Mount the Bridge: Center the application bridge over the damage. Ensure the seal is airtight against the glass.
Phase 2: Injection & Infiltration
Create Vacuum: Use the pump/plunger to draw air out of the crack, creating a vacuum.
Inject Resin: Place several drops of resin into the bridge's reservoir. Release the vacuum. The negative pressure will draw the resin deep into the crack. Apply slight positive pressure if needed.
Soak & Fill: Allow the resin to soak for 1-2 minutes, tapping gently to encourage air bubbles to rise.
Phase 3: Curing & Finishing
Initial Cure: Place the UV lamp over the bridge. Cure for 2-5 minutes. The resin will change from liquid to a gel-like state.
Remove Bridge & Excess: Peel off the bridge and the surface film of uncured resin using a razor blade.
Final Cure: Apply a drop of resin to the surface, cover with a clear curing film, and expose to UV light for a final 5-10 minutes.
Polish: Once fully cured, scrape off any residual resin film and polish the area with a fine glass polish for ultimate clarity.
Key Features & Performance Metrics
Refractive Index: Ideally 1.48 - 1.52 to match soda-lime glass.
Viscosity: Measured in centipoise (cP). Low viscosity (50-200 cP) for hairline cracks; higher viscosity (500-1000 cP) for bullseyes.
Cure Speed & Depth: Dependent on UV lamp intensity (measured in mW/cm²). A strong lamp ensures full-depth cure, not just surface hardening.
Yellowing Resistance: High-quality resins include UV stabilizers to prevent yellowing or degradation from sun exposure over time.
Adhesive Strength: The tensile and shear strength of the cured resin, measured in psi/MPa.
Primary Benefits & Advantages
Cost-Effective: A fraction of the cost of full glass replacement (especially for windshields with expensive sensors/calibration).
Time-Saving: Most repairs take 30-60 minutes versus hours for replacement and adhesive curing.
Preserves Original Equipment (OE) Glass: Maintains the factory seal, acoustic properties, and often the embedded antennas and sensors.
Prevents Crack Spread: Stabilizes the damage, preventing temperature changes and road vibration from turning a small chip into a long crack.
Eco-Friendly: Reduces landfill waste from discarded glass and the environmental footprint of manufacturing and shipping new glass.
Convenience: Many DIY kits are available, and professional mobile repair is quick and common.
Limitations & Important Considerations
Not a Universal Fix: Severely damaged, contaminated (dirty), or edge cracks often cannot be successfully repaired.
Optical Perfection is Rare: While greatly improved, a slight distortion or "ghost" may remain, especially in complex breaks.
Strength Restoration is Partial: While significant, the repair does not restore the glass to 100% of its original impact strength.
Skill-Dependent Results: DIY results vary greatly. Professional technicians achieve better clarity due to experience, superior equipment, and high-grade resins.
Not for Tempered Glass: Tempered glass, when damaged, shatters completely and cannot be repaired.
Windshield Safety: Repairs in the driver's primary view area may be regulated or not recommended due to potential optical distortion.
Safety, Storage & Handling
Personal Protective Equipment (PPE): Wear nitrile gloves and safety glasses. Uncured resin can be a skin irritant.
Ventilation: Use in a well-ventilated area. Avoid inhaling fumes.
UV Light Precautions: Never look directly into the UV cure lamp. It can damage eyes.
Storage: Store resin and kit in a cool, dark place. Refrigeration can extend shelf life (check manufacturer instructions).
Disposal: Follow local regulations for disposing of cured resin and chemical waste.
Buyer's Guide: Choosing a Repair Kit
Identify Your Damage: Match the kit to your damage type (bullseye vs. crack kits have different tools).
Resin Clarity & Viscosity: Look for mentions of "optical clarity" and "low viscosity" for best results.
UV Lamp Power: A higher-power lamp (e.g., 12W UV LED) is far more effective than a small keychain-style light.
Bridge Design: A stable, seal-creating bridge is critical. Avoid flimsy plastic designs.
Brand Reputation: Professional brands (e.g., GlasWeld, Delta Kits) sell consumer versions of their professional materials.
Reviews: Read user reviews focusing on clarity of result, not just ease of use.
Temperature Rating: Ensure the resin is rated for the ambient temperature you'll be working in (some require >15°C / 60°F).
A Masterful Blend of Chemistry and Craft
Glass repair liquid represents a remarkable achievement in materials science, turning a permanent flaw into a manageable, often invisible, imperfection. It is the definitive solution for early-stage glass damage, offering an economically and environmentally smart alternative to replacement. While DIY kits empower individuals to address minor issues, the expertise of a professional technician ensures optimal clarity and strength restoration for critical applications like windshields. Understanding its capabilities, limitations, and the science behind it allows consumers to make informed decisions, saving time, money, and resources while maintaining the integrity of their glass surfaces. In the world of maintenance and repair, it stands out as a true example of a fix that is both elegantly simple and profoundly effective.
 |  |  |
![Sponsored Ad - [2 Pack] Polyurethane Windshield Adhesive - Quick Curing & Weather Resistant Auto Glass Adhesive, Vertical...](https://m.media-amazon.com/images/I/71SOIvJHVXL._AC_UL320_.jpg) | 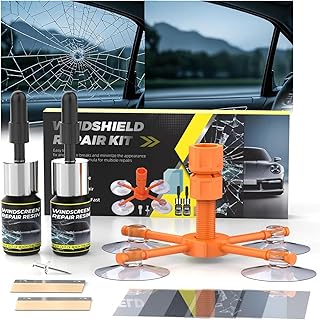 |  |