
In the advertising world, businesses thrive on efficient tools to manage their campaigns, streamline processes, and measure performance. The Advertising Companies Program is designed to revolutionize advertising operations, providing a comprehensive platform tailored to the needs of advertising agencies and marketing teams.
The Advertising Companies Program offers a wide range of features, including managing client accounts and Ad Licenses, scheduling and tracking advertising projects, pricing services and ad placements, handling budgets and billing, and delivering detailed reports for monitoring campaign performance and ROI. Additionally, it supports managing creative assets and coordinating seamlessly with teams and vendors.
This program is built with a user-friendly interface using Microsoft Access tools, ensuring flexibility, scalability, and ease of use. By leveraging these advanced tools, advertising companies can improve their operational efficiency, optimize resource allocation, and drive successful campaigns that meet client expectations.
The Advertising Companies Program features the following:
Multilingual Support: The program is designed to accommodate users from diverse linguistic backgrounds, offering support for multiple languages. This ensures inclusivity and accessibility for a wide range of users.
Free Access: Users can access the Advertising Companies Program without incurring any costs. This affordability makes it an attractive option for institutions operating within budget constraints.
User-Friendly Interface: The program features an intuitive interface that facilitates ease of use for all users, regardless of their level of technological proficiency. This ensures that users can navigate the program with minimal training or guidance.
Customizable Settings: Administrators have the ability to customize various settings within the program to align with the specific needs and preferences of their institution. This includes options to adjust user permissions, configure hierarchy settings, and personalize interface elements.
Ad Licenses Management: The program provides comprehensive tools for managing and tracking advertising licenses. It allows companies to efficiently organize license data, schedule renewals, and generate detailed reports. This ensures smooth operations, reduces the risk of non-compliance, and optimizes the overall management of advertising licenses, all through an intuitive and user-friendly interface.
Barcode Usage: The Advertising Companies Program utilizes barcode technology, which facilitates and speeds up the process of identifying products and items. This capability allows retail stores and warehouses to accurately track inventory and efficiently record transactions. It also helps reduce human errors and increases data input speed, improving inventory management efficiency and saving time and effort in buying and selling processes.
Product Performance Monitoring: The program includes tools to monitor product performance, helping businesses analyze sales data and identify high-performing or underperforming products. This enables informed decision-making to improve production efficiency and optimize resources.
Salesmen Visit Management: The program allows companies to schedule, track, and analyze salesmen's activities, including their client visits and performance evaluations. This feature helps optimize sales strategies, ensure efficient follow-ups, and strengthen customer relationships.
Clients and Vendors: The ability to know the amounts due from customers or to suppliers. For example, in the accounting program, you can use this feature to view outstanding invoices from customers or late payments from suppliers. This feature helps in managing debts and ensuring timely payments, enhancing financial control and improving liquidity
Cash and Inventory: Obtaining cash and inventory balances means knowing the available value of cash and goods in the company or organization. This helps in managing cash flows and determining the extent of availability to meet financial obligations and demands. An example of this is the accounting program that provides effective reports reflecting the cash position and inventory levels, assisting in making strategic decisions for managing funds and resources efficiently.
Financial Statements: Obtaining income statement and balance sheets means analyzing the company's financial performance comprehensively. The income statement includes estimates of revenues and expenses for a certain period, while the balance sheets display the financial status of the company's resources at a specific time. This helps in evaluating profitability, managing finances, and making future financial decisions.
Role-Based Access Control: The program employs role-based access control, allowing administrators to define user roles and permissions based on organizational hierarchy and job responsibilities. This ensures that users only have access to the features and information relevant to their roles.
Audit Trail: The program maintains a detailed audit trail of all user activities and interactions within the platform. This ensures accountability and transparency, as administrators can track user actions and monitor system usage.
Secure Communication: Security measures are implemented to safeguard sensitive information exchanged within the Advertising Companies Program. This includes encryption protocols, user authentication mechanisms, and data access controls to protect against unauthorized access and data breaches.
Here, we explain the steps for setting up and working with a multilingual Advertising Companies Program as follows:
Language Selection:
When opening the program, you will find an interface to choose your preferred language for working with the software. Here, we will select the English language and then click on the "Run" button.

Logging into the Program:
Write the username and password, and here is the system admin's username is "ahmed," and the password is "123" Upon pressing the Enter key, the possibility to change the password will be available.

System Interface:
By clicking on 'login', the main interface of the program will appear, and the settings menu will be displayed when logging in with the system admin's account.

Settings:
By clicking on 'Settings', this interface for adjusting the program settings will appear. Through this window, you can specify the location of the program folder where files will be copied. This folder could be on the same device, shared device or server. You can also specify the name and location of the database. Once you press 'Save', the data will be saved and a database will be created at the chosen location, and by pressing 'Shortcut', the data will be saved and the program will be converted into a shortcut that can be copied anywhere to maintain the confidentiality of the recorded data, which can be accessed through the program according to each user's permissions.
From here, you can create backups of the program and restore any backup at any time.

System Users and Their Permissions:
By clicking on "Users," this interface will appear to add, modify, or delete system users and specify their permissions, which are as follows:
Admin: Have access to all menus, allowing them to modify all program components.
Data Entry: This displays daily lists and accounts for adding and modifying data that has been recorded through him or by employees under his management.
Accounts: This displays daily lists and accounts, showing all the data entered into the company and allowing modifications.
Final: This displays the income statement and balance sheet, allowing access to the final accounts of the company.


By clicking on the username, the user can edit his own data such as changing the password, username, or profile picture.
Account Type:
When clicking on " Account Type," this interface will display the types of accounts that are created to work with in the program. Simple modifications can be made, but no addition or deletion of any account type is allowed.

Transaction: When clicking on " Transaction," this interface will appear to display the various transactions in the program. Simple modifications can be made, but no addition or deletion of any transaction is allowed.
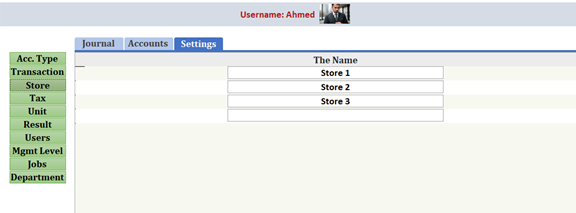
Store: When clicking on " Store," this interface will appear to add, modify, and delete the names of warehouses within the company.
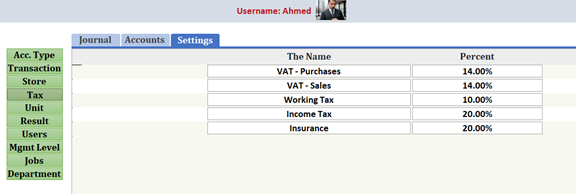
Tax: When clicking on " Tax," this interface will display the types of taxes along with insurance, and next to each type, the percentage of each tax will be shown, which is automatically calculated by the program according to the registered rates. It can be modified, including making simple changes to tax names, but addition or deletion of any tax type is not allowed.
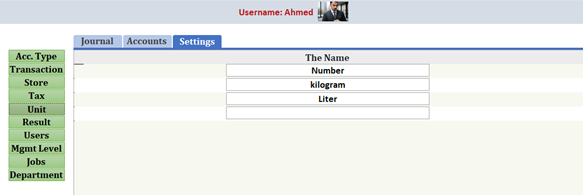
Unit: When clicking on " Unit," this interface will appear to add, edit, and delete unit names, which are selected when creating items in the program.
Result: When clicking on "Result," this interface will appear to add, edit, and delete the names of purpose and results, which are selected when recording salesmen visits in the "Visits" window.

Management Level:
When clicking on the management level, this interface will appear to display the three management levels starting from the owner to the employee. It is possible to change the name of the management level, but adding or deleting any of these levels is not allowed.

Location:
When clicking on the "Location," This interface will appear to add, modify and delete the names of licensing authorities, cities, districts, streets and the names of licensees.
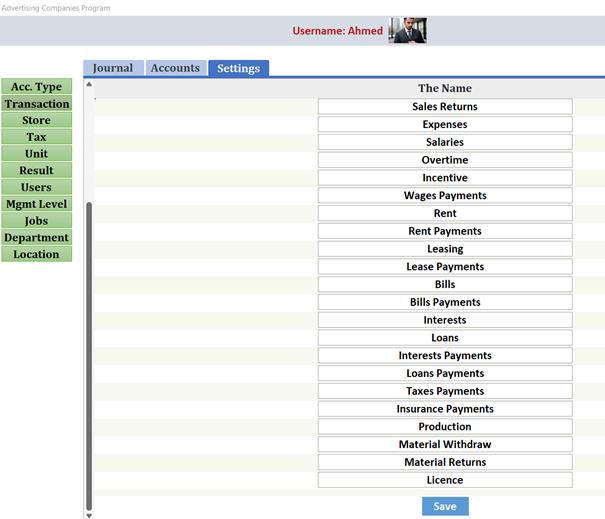
The remaining settings menus:
Titles can be changed, and additions or deletions can be made to any of the remaining settings menu items according to work requirements.
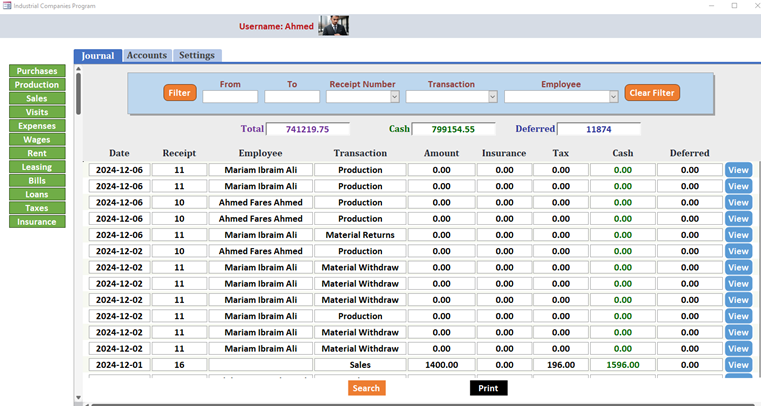
Journal:
When clicking on Journal, this interface will display all daily operations performed in the company, arranged in descending order by date. Filtering can be done from the top menus either by date, invoice number, receipt, transaction, or employee.
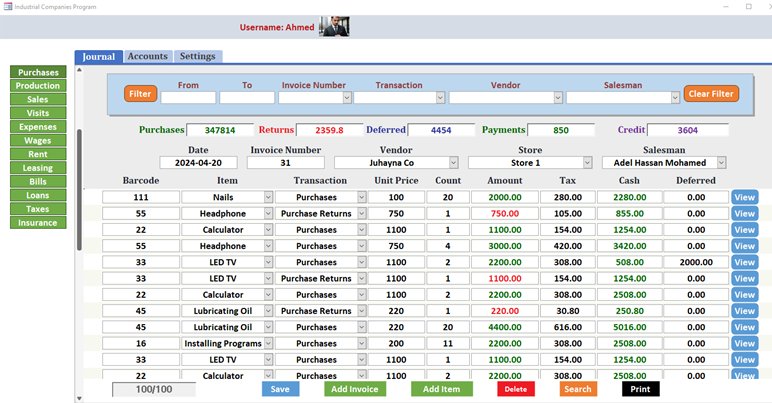
Purchases:
When clicking on Purchases, this interface will be used for recording, editing, and deleting purchasing operations, including three types of transactions: purchases, returns, and payments. Here, items can be summoned either from the dropdown list or through barcode scanning. Once an item is selected, the last purchase price of this item and the value-added tax (VAT) will be displayed, which can be modified. By clicking "Add Invoice," a new invoice can be recorded, and an automatic invoice number will be displayed, which can be edited. The supplier will automatically be cash and the first warehouse, which can also be edited. By clicking "Add Item," an item can be added to any selected invoice. Filtering can be done through the top menus.
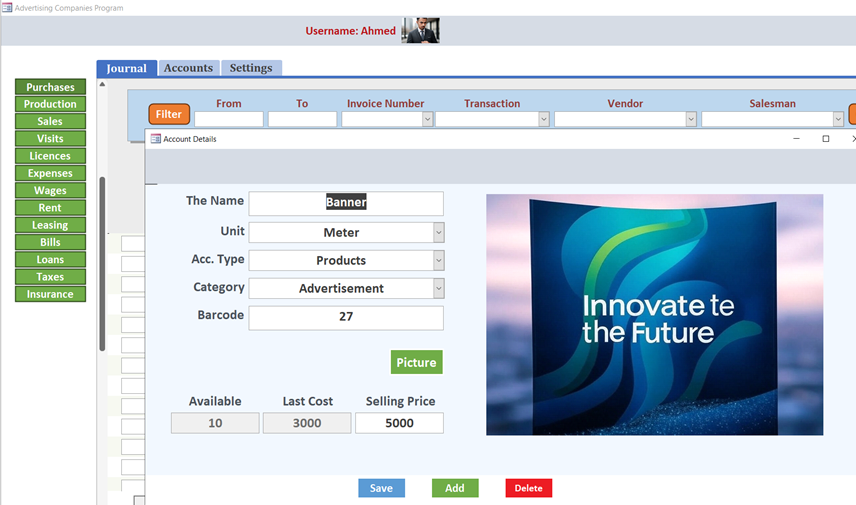
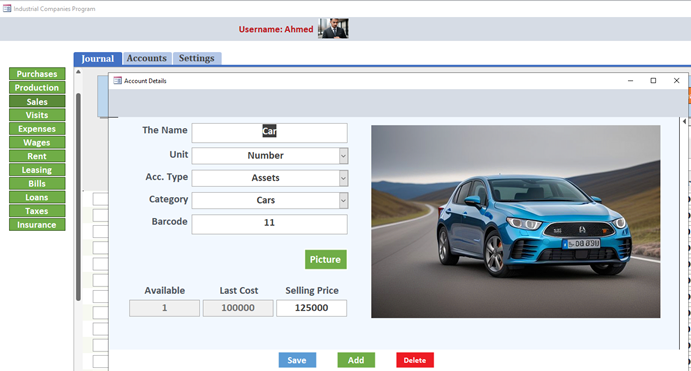
When clicking on "View," the following window will appear to display details of this item, including its availability in the warehouse, its last purchase cost, and also its selling price.
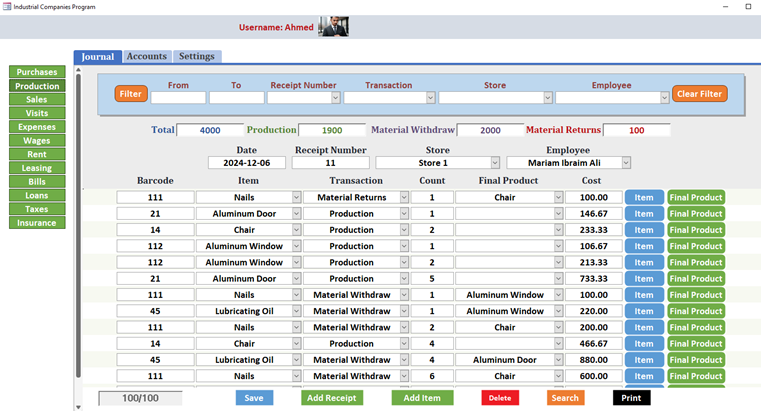
Production:
When clicking on "Production," this interface will appear to record, edit, and delete production operations. It includes three transactions: production, material withdraw, and material returns. Items can be selected either from the dropdown menu or through barcode scanning. Upon selecting an item, the production cost will be displayed, calculated as the product of the latest purchase price and the production quantity for material withdraw and returns.
For production, the cost is displayed based on the price and quantity of materials used in manufacturing. Through the "Finished Product" list, the product that the materials were used to create can be selected. By clicking "Add Item," you can insert an item into any selected receipt, and by clicking "Add Receipt," you can add the materials and production details for that specific receipt along with its date. Filtering options are available through the upper menus.
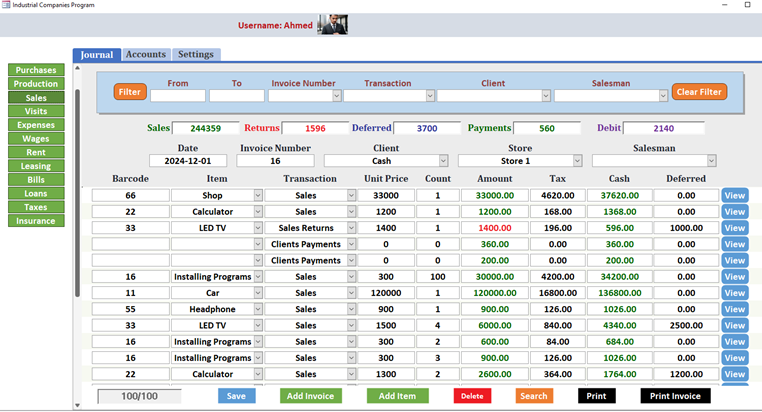
Sales:
When clicking on Sales, this interface will be used for recording, editing, and deleting selling operations, including three types of transactions: sales, returns, and payments. Here, items can be summoned either from the dropdown list or through barcode scanning. Once an item is selected, the price of this item and the value-added tax (VAT) will be displayed, which can be modified. By clicking "Add Invoice," a new invoice can be recorded, and an automatic invoice number will be displayed, which can be edited. The client will automatically be cash and the first warehouse, which can also be edited. By clicking "Add Item," an item can be added to any selected invoice. Filtering can be done through the top menus.
When clicking on "View," the following window will appear to display details of this item, including its availability in the warehouse, its last purchase cost, and also its selling price.
By clicking on "Print," a preview of the selected invoice will be displayed, including the date, invoice number, customer name, sold items, their prices and quantities, tax, print date, and the amount paid in cash.

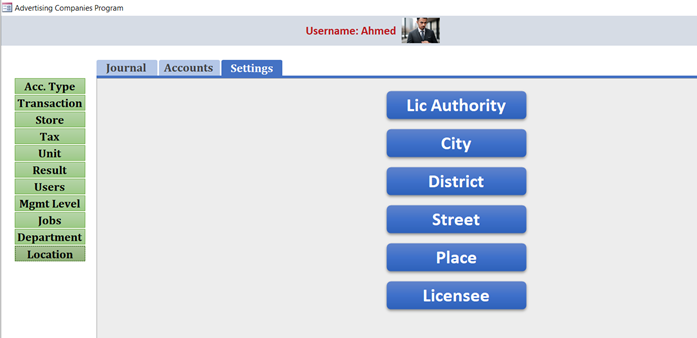
Licences:
When clicking on Licences, this interface will be used To record, modify and delete licensing operations, including advertisements, and once the license is selected, the price will be displayed according to the last value recorded for it, which can be modified, and an automatic number will be displayed for the receipt number, which can be modified.

By clicking on Details, the following window will be displayed, through which you can add or modify other details of the license, including the licensing authority, city, district or region, street, location, licensee, and the start and end dates of the license.

The remaining journal menus:
Other financial operations can be added, modified, or deleted through the remaining Journal menus, which include salesmen visits, expenses, wages, rent, leasing assets to others, monthly bills such as electricity and water, as well as loans, accrued interests, due taxes and insurances, and paid amounts.
Items:
When clicking on "Accounts" then "Items," this interface will appear to record, edit, and delete various item accounts. Through this interface, it is possible to change the price for one item or multiple items at once, according to a specific category, account type, or specific price range. This can be done by changing the price to a specific amount, increasing it by a specified amount, or a certain percentage of the previous price. The ability to add, edit, delete, or set prices is granted to those with accounts permissions, as well as to the system administrator and the company owner.

Cash:
When you click on "Cash," this interface will appear to display all cash transactions and their impact on the cash balance. If you select the starting date, the initial cash balance will be shown. Adding to this balance and subtracting from it for each transaction results in the final cash balance. This process is applied to each transaction, with summaries displayed above. Filtering can be done through the top menus. The data displayed will be specific to the user and also include operation data for employees under his managed department. All data will be visible to those with accounts permissions, as well as to the system administrator and the company owner.

Stores:
When you click on " Stores," this interface will appear to display all sales and purchase transactions and their impact on the inventory balance. If you select the starting date, the initial inventory balance will be shown. Adding to this balance and subtracting from it for each transaction results in the final inventory balance. This process is applied to each transaction, with summaries displayed above. Filtering can be done through the top menus. The data displayed will be specific to the user and also include operation data for employees under his managed department. All data will be visible to those with accounts permissions, as well as to the system administrator and the company owner.

Vendors:
When you click on " Vendors," this interface will display all purchase transactions and their impact on supplier balances. If you select the starting date, the initial balance for suppliers will be shown. Adding deferred purchases, subtracting deferred returns, and recording payments will result in the final balance for suppliers. This process is applied to each transaction, with summaries displayed above. Filtering can be done through the top menus. The data displayed will be specific to the user and also include operation data for employees under his managed department. All data will be visible to those with accounts permissions, as well as to the system administrator and the company owner.

Clients:
When you click on " Clients," this interface will display all sales transactions and their impact on customer balances. If you select the starting date, the initial balance for customers will be shown. Adding deferred sales, subtracting deferred returns, and recording receipts will result in the final balance for customers. This process is applied to each transaction, with summaries displayed above. Filtering can be done through the top menus. The data displayed will be specific to the user and also include operation data for employees under his managed department. All data will be visible to those with accounts permissions, as well as to the system administrator and the company owner.

Capital:
When you click on " Capital," this interface will display all capital transactions including payments and withdrawals for partners and their impact on the credit balance of the partners' account, with summaries displayed above. Filtering can be done through the top menus. The data displayed will be specific to the user and also include operation data for employees under his managed department. All data will be visible to those with accounts permissions, as well as to the system administrator and the company owner.

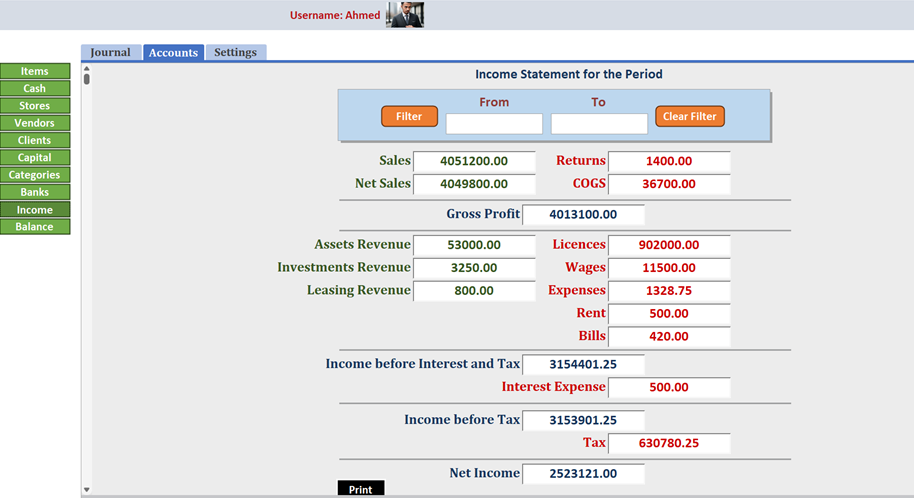
Income:
When you click on " Income," this interface will display the company's income statement. You can specify any period, start date, or end date to view the profit or loss during that period. The income statement will be visible to those with final permissions, as well as to the system administrator and the company owner.
Balance:
When you click on " Balance," this interface will display the company's balance sheet or financial position. You can specify a specific date to view the financial position on that date. The balance sheet will be visible to those with final permissions, as well as to the system administrator and the company owner.

Request Professional Edition
Download Free Trial >> 👇 👇 👇
Free Multilingual Advertising Program V1 Download
 |  |  |